Introduction
Glossary
What are modules and how to search modules
What is a Widget?
Organisation in general
Terms by organization name
Wat is person in Newbase?
Difference between contact and person
Use of addresses
Telephone number format
What is a customer project
Pre- post calculation on a customer project
Difference between to be claimed and to be invoiced
Role
Hour type
Cost type
ETA - Estimated Time of Arrival
ETD - Estimated Time of Departure
Difference between a set and a composed product.
What are valuelists?
What is a template?
What is return value?
What is an order proposition?
What are dimensions?
What is a correspondence user?
What is dropshipment / dropshipping
General functions
How to search in Newbase
Send login details
Log in to Newbase
Difference start screen - summary screen - edit screen - quick edit
Change / edit name / title of a tab
Create and save your own search on a summary screen or in a list
Standard (pre-programmed) list views
Show totals of a list
How to adjust the order of columns in a list
Group data in a list and/or select which colums in a list you want to see
Listview editor - create your own list - add standard lists
Turn a listview into a board view
Add or remove colums within a widget
Duplicate / Copy documents and possibly renew data
Replace data in a selection of records
Navigate to related records
How does file storage work in Newbase? How are pdf files created?
Shortcuts
Webservice / API Newbase
Why don't I see the 'next step' button?
Copy widgets and privileges from role to role
Processes
CRM
Create organisation
Modify organisation address
Create contact
Modify organisation address (duplicate)
Create a new private contact or create a private contact from an existing person
Create message
Send invoice to department > create department as contact
Check if messages are send
How to create a contact report
Working with taska
How to create a note
Replacing an internal employee at an organization or contact in one go
Create an appointment
There is no email address in a message
Delete contact or set to inactive?
Unable to send a message / email
Import / sychronise emails
Sending emails / messages in a series / batch
Entry screen of a message
Relocation, address or reachability changes in future
Message content has different fontsizes
Export CRM data such as email addresses and addresses to Excel
Products
Create product group
Link a product to a product group
Can you link a product to multiple product groups?
Create a product
Where to enter of adjust the sales price of a product
Purchase price product: with or without (multiple) supplier(s)
Add stock location to a product > create stock product
Set unit / entity code of purchasing & sales for a product
Add product image
Link product attachment and send automatically
Working with stock finished products (SFP) - producing for stock with an assembly order
How to set the standard purchase price of a product?
Update standard purchase price of existing products
Standard purchase price at a composed product
Consequences of entering standard purchase price afterwords
Does the standard purchase price determine the margin?
Calculation stock value via standard purchase price
Product can only be purchased for stock
Can you change a product code?
Check and allow double (duplicate) product codes / part numbers
Blocked or phased out products
Stock value on x date
Create a composed product
Price agreements debtor (per product or per rebate group)
Create of modify commercial description of a product > multiple languages
How can you find product that not have been sold during the last 'X' period
Create a set of products
Sales
Create sales lead
Create sales opportunity
Create sales quotation
Set validity period on sales quotations
Create sales order
Credit sales order
Link a payment phasing to a sales order
Search for payment phasing lines still to be invoiced and create invoices
Modify / adjust existing payment phasing line
Create sales invoice
Booking sales invoices to Twinfield
Credit sales invoice
Delete a sales invoice
Create proforma invoice
UBL (XML) Sales invoice - e-factoring - OIN - HRN number
Link products to a document
How can I see the stock in a sales document?
Create a collective invoice from different sales orders or deliveries (collect invoice lines)
Why is a sales order not found using the query 'to be invoiced'
How does a discount / surcharge work in Newbase?
Re-book a sales invoice to Twinfield or set it to manually booked
Give a sales invoice another date - backdating
Set a sales invoice (partly) to paid manually
Whether or not to print a sales invoice line with number 0
There is no VAT on the order or invoice
Want to link a debtor to a document but cannot find the debtor?
Adjust quantities on a sales order if there is already a purchase order, receipt, delivery?
Whether or not to print a sales invoice line with quantity 0
List of sales invoices with purchase - sales - margin
How is the expiry date of a sales invoice determined?
Check stock within a sales order
Error when booking to Twinfield: ...performance type must be entered
Create RMA (Return Merchandise Authorization)
Reserve products for a sales quotation
Replace discount/surcharge in all lines in one go
How can you renew / update product data in existing financial sales documents?
Set a sales order to 'paid'
Overview and check payment phasings via listview sales orders
Standard query 'my open sales quotations'
Search for sales orders still to be invoiced
Export lines to excel
Why is the sales price not adjusted and what is the difference between updating and indexing product prices?
How does drop shipment / drop shipping work in Newbase?
Purchase
Book purchase invoice to Twinfield
How to create a creditor
Create purchase order via a RFQ (request for quotation)
Create separate purchase order (by for stock)
Create a purchase order via sales order (no stock booking)
Create purchase orders from a selection of sales orders (collect)
Linking a project to a purchase order after goods are received
Cancel a purchase order
Prepay a purchase invoice (pro forma purchase invoice)
Indicate goods that will no longer be received
Book a purchase invoice or a sales invoice from a previous year
Create RTV (Return to Vendor)
Purchasing for multiple projects and/or sales orders on one purchase order
How do you find purchase orders (lines) for which the receipt (line) has not yet been linked to a purchase invoice (line)?
Delivery date on a purchase order
How can you see on a purchase invoice line whether a receipt has been linked?
How can you see on a purchase order or receipt whether a purchase invoice is linked?
Logistics
Stock value list
General informatie goods delivery
Create 1 of more delivery notes
Partial delivery (of composed product)
Print a delivery note / pick list
Search for goods that are still to be deliverd
Deliver more goods than on sales order
Indicate that goods will no longer be delivered
Return delivery of products that have already been issued
Creata a receipt / adjust quantiy on receipt
Separate stock mutation / stock correction
How does stock work in Newbase? Why are products not added to the stock
Search for products / goods still te be received (purchase order to be received)
Purchasing for stock with an stock order proposal
Set a sales order to 'manually invoiced' (duplicate)
Set that goods cannot be deliverd if not paid / block delivery
When is a product allocated > what is allocation?
How can you see on a receipt which goods still need to be delivered?
How do you get products back into stock if you are not going to deliver them?
Move stock of 1 or more products to another stock location
Do you work multi-company and want to purchase from company B for a sales order from company A?
Search for products to be ordered
Projects
Work with hour types and cost types
The order of determining an hourly rate on a project
Change project status
Create a (private) debtor (and choose company)
Link a different debtor to a organization (debtor connection)
Get payments from Twinfield (debtors)
Manually set an invoice to booked or not booked in Newbase
Can you duplicate a purchase order to a purchase invoice?
Search for sales invoices to be reminded via the open sales invoices module
Set debtor or invoice to: do not remind / no reminders
Journal entries
Set debtor to direct debit
Sales invoice always to the same person / contact
Product prices have changed and would you like to update them on member lines?
Import and export functions
Settings
Create personal shortcuts
Modify widgets (add, move, remove, resize)
Create new user
Give permission to send message from or on behalf of another user
De-block user
Delete user or set to inactive?
Edit role options: rights - privileges - options - searches - required fields
Setting up 2 factor authentication
Setting up Microsoft Office 365 (Mail and Sharepoint)
How can an application manager authorize Microsoft 365 for a user
Before you start setting up reference numbers
Using code at settings reference numbers
What is the program translations?
Editing or creating translations
How do you create a template for a message or a start/end text of a document?
Merge codes in a template
Link attachement to template
General information ledgers
Create or change ledger numbers
Where can you find ledger numbers and what order of ledger numbers is used?
Where can you enter cost accounts?
Create a payment phasing (settings)
VAT codes Newbase - Twinfield
VAT Settings
Send URL / link / login details for time registration / TIME application
HTML usage in Newbase
How does currency work within Newbase
What to do at an annual change?
Change / adjust a print with parameters or add an extra print
Select another company (for multi-company use)
How to create a stock location
Message not send / marked as send
Work with a Print template (MS Word)
Customize start / home screen - add new/additional home screen at top left - add modules
Export user role privileges
Edit valuelists
Missing attachments for Peppol purchase invoices
Peppol matching of debtors and creditors
Unable to email message with attachment > File cannot be saved Microsoft 365
Setting up Peppol via Storecove for purchase and/or sales invoices & tips
Explanation of user checkboxes
Error message Peppol
Changing widgets from one role to another by the application administrator
Add overview / dashboard with numbers (to see work load)
Error: Cannot Parse XML error
Content of description and free text fields in Twinfield
Widgets summary
Errors
Error when booking to Twinfield: ... dimension 2 cannot be empty when dimension 3 is used
Error when booking to Twinfield: ...booking not balanced
Error when booking to Twinfield: ..... cannot be sub analyzed
Error when booking to Twinfield: ....invalid performance country (duplicate)
Error when booking to Twinfield: ...booking not balanced (duplicate)
Error when booking to Twinfield: ....invalid performance country
Error: type error can't use in on a non object....drive Api
Error: Cannot read property 'length' from ...drive api
- All Categories
- Processes
- CRM
- Create a new private contact or create a private contact from an existing person
Create a new private contact or create a private contact from an existing person
 Updated
by MJA
Updated
by MJA
Newbase works with persons and contacts.
The person module contains data about the person such as name, gender, private data.
The contact module contains business data.
A person always only appears once in Newbase, but this person can appear multiple times as a contact in Newbase. For example, working for company A and working for company B. For more information about the difference between person and contact click here
If a contact is not linked to an organization, we call it a private contact
1. Create a new private person
To create a private contact, follow the steps below.
For more information about creating a contact linked to an organisation, click here.
- Go to the Contact module and click on New
- Only complete the fields in the Person or Department box
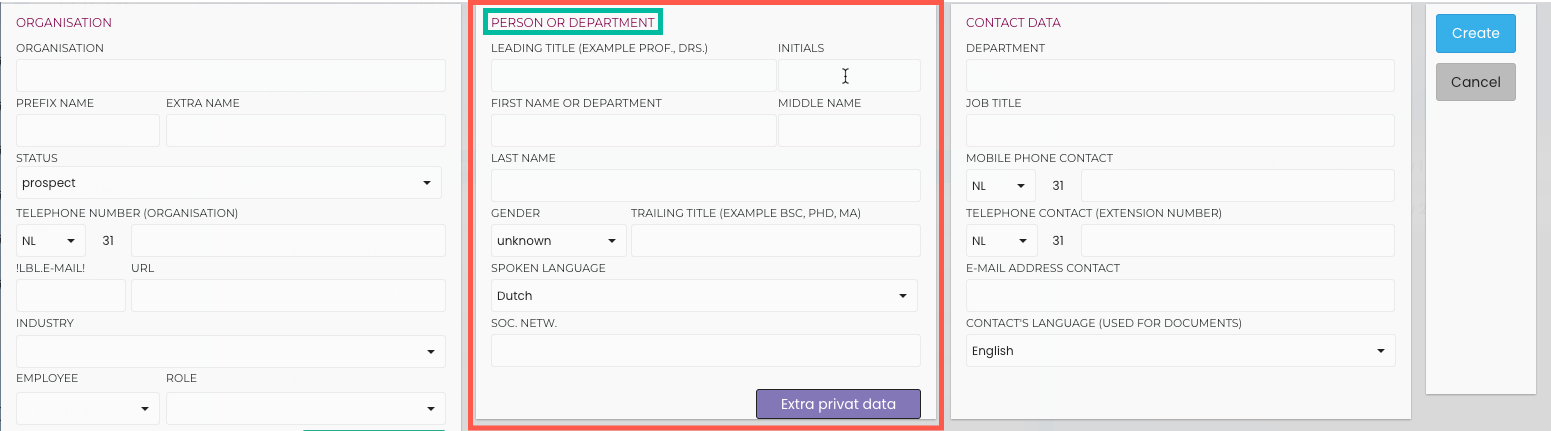
- Click on the 'Extra Private Data' button to enter the address details, telephone number and email address
- Click on 'Create' to create the private contact
2. Turning an existing person into a private contact
- Go to the person module and find the person for whom you want to create a private contact
- In the 'linked contacts' widget you can see whether this person is also linked to an organization or whether this person has already been created as a private contact
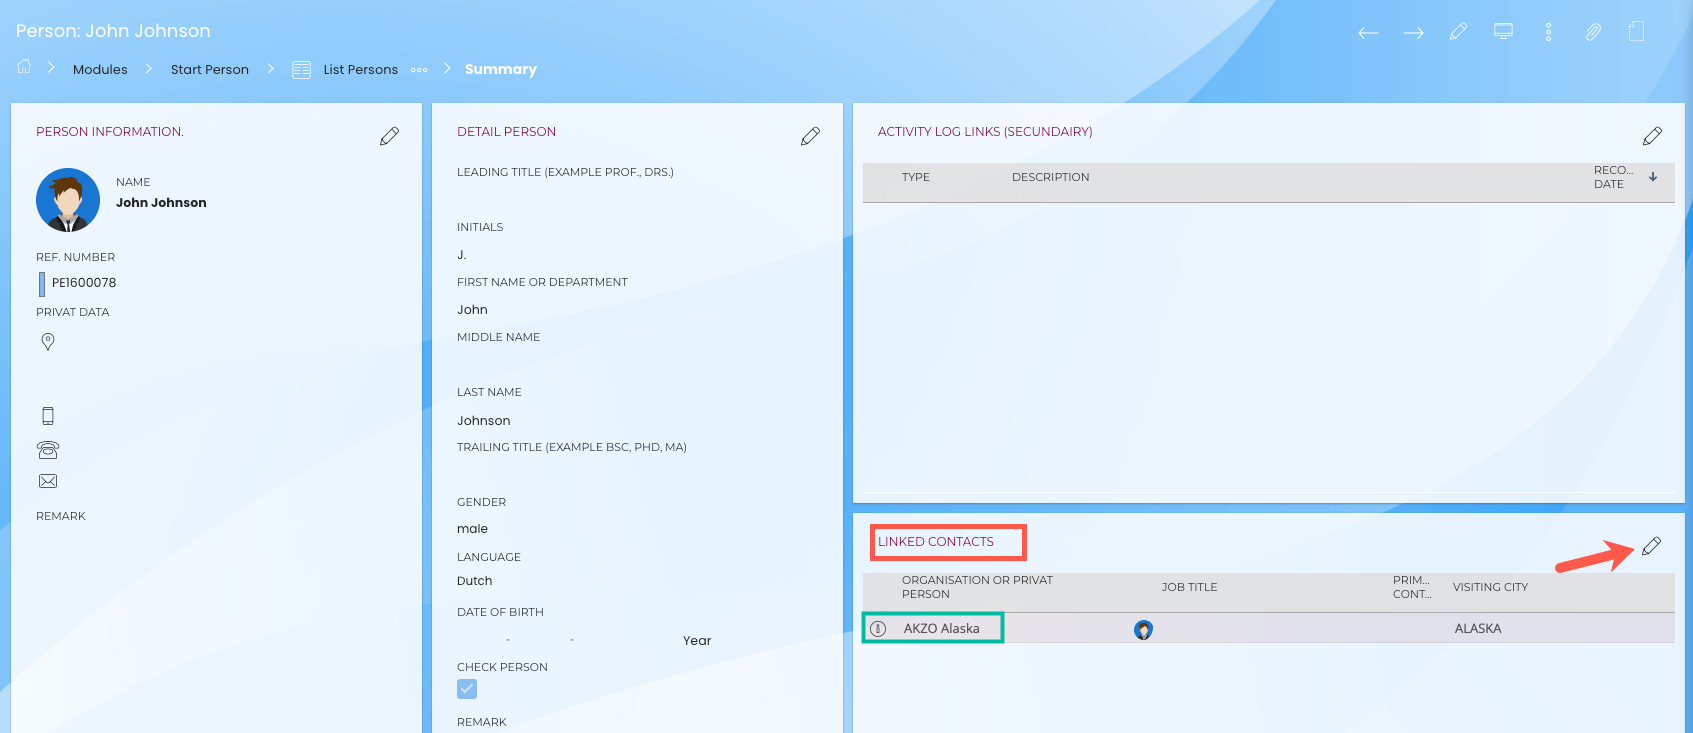
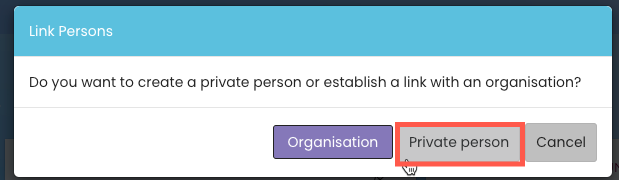
- If you want to make this person a private contact click on the pencil icon of this widget and then click on the plus icon in the pop-up and choose 'private person'
- Now the 'organisation, person, contact input screen opens. You will see in the green frame that the chosen person has already been linked. To create a private contact of this person, enter information in the red box 'contact' data. Enter NOTHING in Organization.
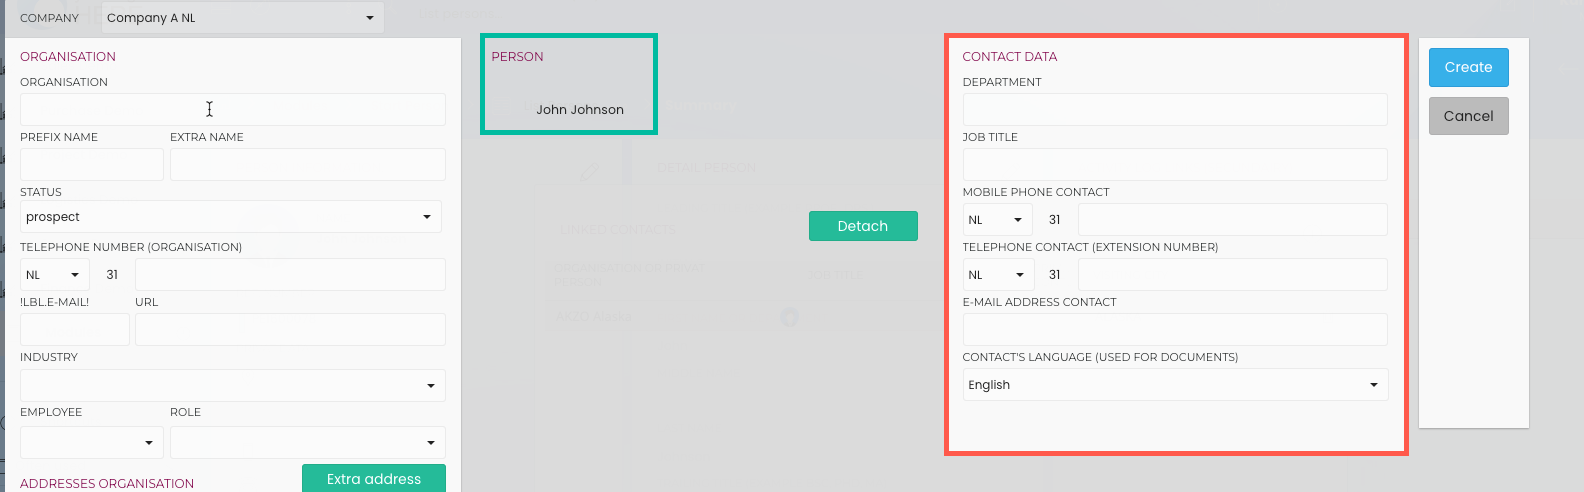
- Click create